
- Helplines:
- + 91-83-5599-2000 |
- 83-5599-3000 |
- Mail:
- [email protected]


Do you ever get frustrated when taking pictures of an amazing sunset? You look at that beautiful scenery in awe, you shoot as that sunset were the last one you'll see in your life, and when you check the results all you have is a bad copy of what your eyes are witnessing.
SO DISAPPOINTING, right?
If you ever felt this way, don't worry! In this article we give you some step by step instructions for taking amazing sunset pictures that could easily be featured on National Geographic magazine, even if you are just an amateur photographer. You don't believe us? Keep on reading!
To convince you that it's possible, I will use some of my pictures and tell you what I did to improve them.
Disclaimer: We are not a professional, we simply love photography and we been experimenting for years and we want to share our tips with you, as many people pointed out that my photography has improved a lot during our travels.
We will be talking about sunset pictures as well as giving you a general overview on how to improve every type of picture!
There are so many variables to define a good picture. Not considering the obvious "technical aspects", a quality photo must have the incredible power to tell you a story, to move you emotions.
You can achieve this result in many ways, sometimes even with a shot taken from a crappy mobile phone. All you need to know is when/ how to take it and a few simple post production tricks.
Let's start with a comparison between an average shot and a really good one. We using our travel pictures as an example, because I know what kind of light there was when I took the shots and how We edited the images in post production.
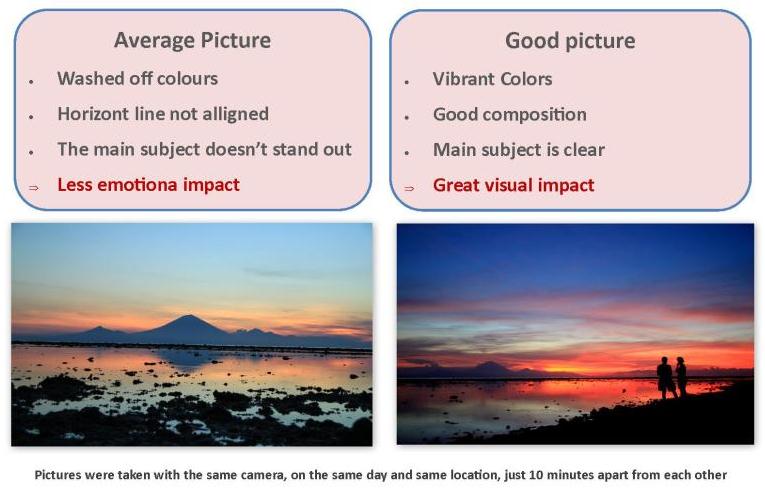
COLOR SATURATION:
On edited photo the colors are very intense because I was trying to recreate the scene as it was in real life, and the colors were THAT intense. Some people may even prefer the original one, but the colors were totally washed off. It all depends on personal taste but as a general rule I think that less is always better.
CHOOSE OVER EXPOSED PICTURES:
I always choose the brighter picture and add some contrast to revive the colors. I rarely use the saturation tool, as most of the times it gives a "fake" look to the image (you can play with both and see what is the best result for you). Trying to edit under exposed pictures is more difficult as when you add brightness to them they will look grainy.
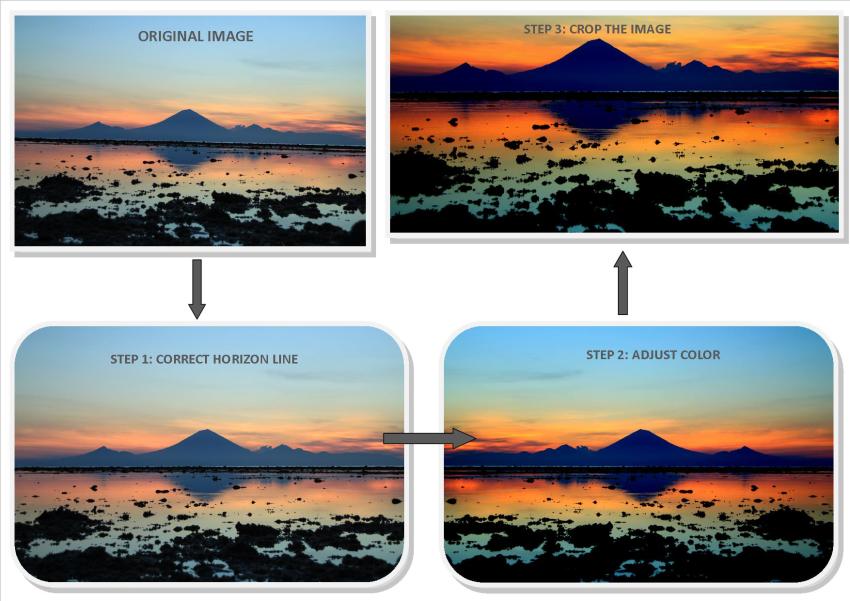
DETAILS ARE IMPORTANT:
When cropping a picture pay attention to the details, if the image is not 100% sharp when zoomed, the result are not very good/professional. I'm very picky when it comes to sharpness but I still need to improve on that. This is especially true if you want landscape or sunset pictures that really stand out and look amazing.
Going back to my favorite photography subjects: Sunsets. The light at sunset is one of the most beautiful and soft to get some great pictures, the only problem is that if you don't know exactly which settings to change, you risk missing that "perfect light", as it gets dark very quickly.
Here are a few examples on how I changed 1 parameter, in this case the shutter speed for different results. If you don’t understand the wording, don't worry: i put together a detailed chapter to explain the different settings below.
1) SHUTTER SPEED:
Defines the "length of exposure": how many seconds (or fraction of sec) the shutter stays open. The more it remains open, the brighter the picture will be. Example: I used 1/60 and 1/80. A lower the number means a brighter picture.
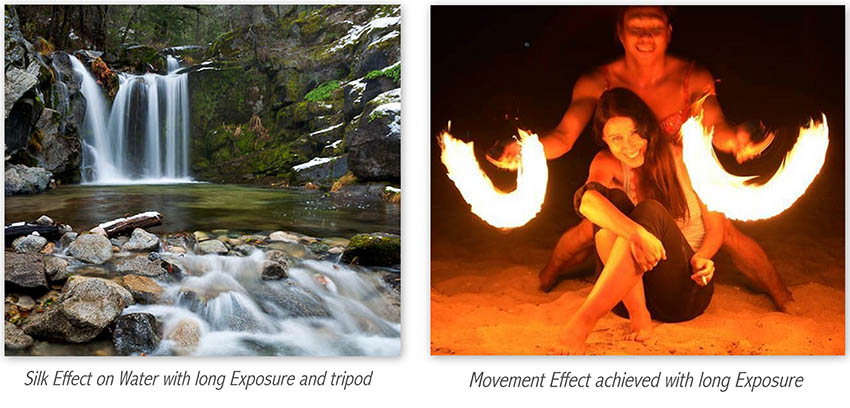
Downside: In poor light conditions you always need a tripod, or a surface to keep the camera still when shooting. When the shutter remains open for a long time any movement can result in a blurred picture. It would be wrong to give you fixed parameters, as it all depends on how dark it is. I always start my trials at 1/80, going up or down depending on the result.
Below are some cool examples on what you can achieve using the shutter speed option. I like the "silky effect" on water, but there are so many other nice effect. Just play with the settings and enjoy the results!
2) ISO:
Indicate how sensitive is the camera to the light. It starts from 100 (less sensitive) and goes up to 3200 (not for all the cameras). I am referring to the setting of my beloved DSLR camera, a Canon 550D, but the settings are similar for all the DSLR's.
You should use the ISO combined with the other settings to find the perfect balance. Lower ISO means less light but also less noise (sharper image). Higher ISO means brighter picture but less sharpness. I rarely go over 400/600. Unless it's night and there are no lights, but even in that case I prefer to use a tripod and leave the shutter opened for 5/10 seconds.
3) APERTURE:
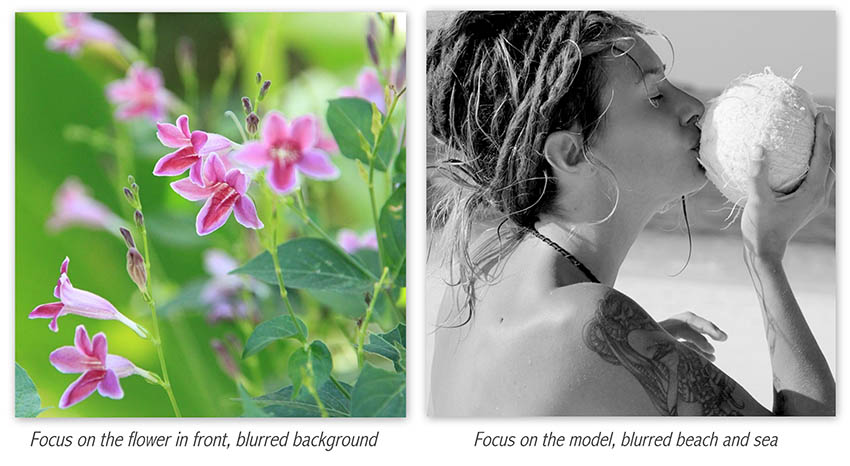
It defines how much the lens is opened (how much light enter the lens). It works like our pupils: they get larger in the dark and smaller when it's bright. The aperture is very important when it comes to decide if we want the background in focus or out of focus (also called "depth of field").
In English: a smaller aperture (f 8/9 up) both the subject and the background are on focus, a larger aperture (f 3.2 or down) only keep the subject on focus, blurring the background.
For landscapes/sunsets pictures we want everything on focus, so you should choose a smaller aperture (f 8-10 and up). If you decide to use this setting alone, the camera will set the shutter speed automatically. If you want everything on focus, you choose a small aperture which means less light and the camera will give you a longer exposure. Meaning: you need a tripod to avoid blurry pictures!
I use a large aperture for portraits or to focus on a specific detail, below are some examples:
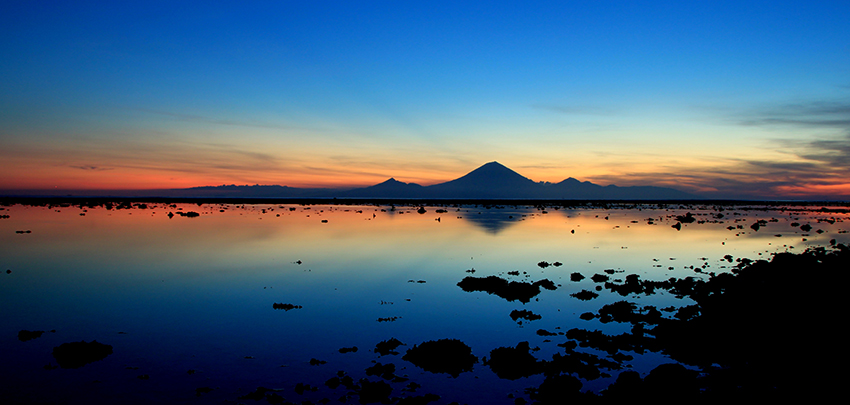
For this picture I finally got all the settings right: I placed the camera on a flat rock, I left the shutter opened for 0.5 second (for the brightness and silky effect) and set the aperture at f/12 (to have everything on focus). A note: I didn’t edit this picture at all. This is what happens when you use the manual settings right!
Now let's see some pictures where I totally screwed the settings. I will explain what I did wrong and I will give you some more tips to improve and learn from my mistakes.
READ ON!
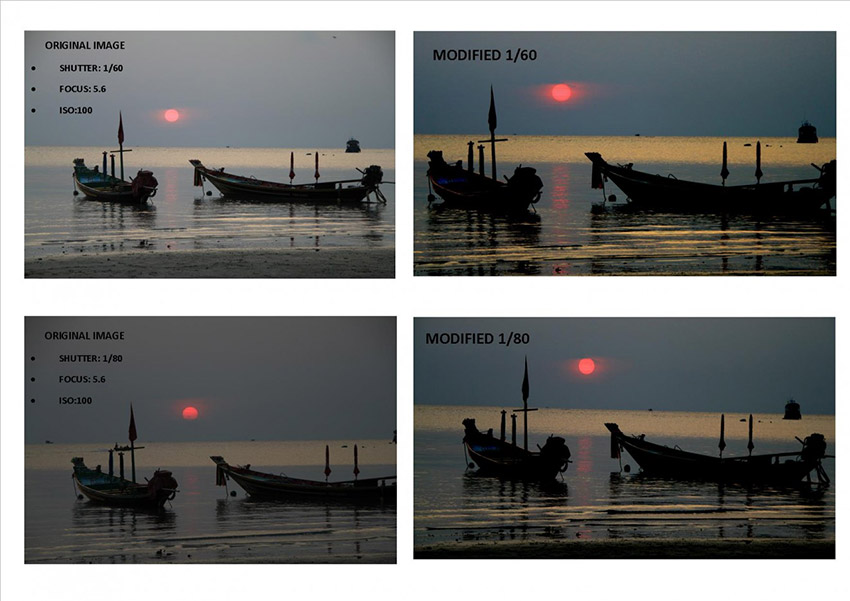
In these pictures I used only one setting :the shutter speed and I left the same ISO and Aperture. So let's see the mistakes I made:
1) WRONG APERTURE (f 5.6): If you could zoom the pic, you'd see that the focus is mainly on the boats, and the sea is slightly out of focus. Since I chose to use only one manual setting (the shutter speed),the camera chose the other settings for me. I could have used the full manual options to have total control on the shot.
2) ISO TOO LOW: I used 100, which is the minimum and it was very dark, so I should have used at least 200/400.
3) NO TRIPOD: Controlling the shutter speed manually in poor light conditions without the tripod? Terrible mistake! If I had one I could have used full manual settings and get much better results.
This is a good example on how challenging it is to take good shots when it is already too dark, this is why you should know how to use the manual settings.
When you know how to use the manual settings properly, you'll take much better pictures! 100% guaranteed!


.png)